Red Sift’s email protocol configuration guide
- Learn more about DKIM
- Setting up DKIM step by step
- Why is DKIM key rotation important?
- How often should DKIM keys be rotated?
- What’s a long DKIM Key?
- What is DKIM canonicalization?
- What is a DKIM selector?
- What is the l= tag in DKIM?
- What are the security concerns around using the l= tag in DKIM?
- What is DKIM Header oversigning?
- What is a DKIM replay attack?
- What makes a DKIM attack so dangerous?
- How does DKIM help with forwarded mail?
- Can an email contain more than one DKIM signature i.e. be DKIM signed multiple times?
- How does ARC come into play when DKIM or DMARC fail?
- Common DKIM misconfigurations
- DKIM recommendations summary
- Technical DKIM configuration tips
- Generating 2048 bits DKIM public and private keys using OpenSSL on a Mac
- Learn more about DKIM
- Setting up DKIM step by step
- Why is DKIM key rotation important?
- How often should DKIM keys be rotated?
- What’s a long DKIM Key?
- What is DKIM canonicalization?
- What is a DKIM selector?
- What is the l= tag in DKIM?
- What are the security concerns around using the l= tag in DKIM?
- What is DKIM Header oversigning?
- What is a DKIM replay attack?
- What makes a DKIM attack so dangerous?
- How does DKIM help with forwarded mail?
- Can an email contain more than one DKIM signature i.e. be DKIM signed multiple times?
- How does ARC come into play when DKIM or DMARC fail?
- Common DKIM misconfigurations
- DKIM recommendations summary
- Technical DKIM configuration tips
- Generating 2048 bits DKIM public and private keys using OpenSSL on a Mac
Learn more about DKIM
Setting up DKIM step by step
If you're implementing DKIM for the first time, here's the order to do it in. Each step links to the relevant detail further down this page if you need it.
Step 1: Generate a 2048-bit key pair
DKIM runs on a private and public key pair. Your sending server holds the private key and uses it to sign outgoing mail. The public key gets published in your DNS so receiving servers can verify the signature.
Use RSA at 2048 bits. Most mail platforms and ESPs (Google Workspace, Microsoft 365, SendGrid, Mailchimp, and similar) generate this key pair for you inside their admin console when you enable DKIM, so you often won't need to do this manually. If you're managing your own mail server or need to generate keys yourself, see "Generating 2048 bits DKIM public and private keys using OpenSSL on a Mac" further down this page.
Step 2: Publish the public key in your DNS
Your platform will give you a selector name and a public key value. The selector is what tells a receiving server where to look for your key, and no two sending services should share one. See "What is a DKIM selector?" for how this works.
A 2048-bit key is usually too long for a single DNS TXT string. If your DNS provider doesn't split it automatically, see "What's a long DKIM key?" for exactly how to break it into multiple quoted strings.
Step 3: Turn on DKIM signing, aligned to your domain
Enabling DKIM in your platform and publishing the DNS record isn't the same as signing correctly. Most ESPs and marketing platforms sign with their own domain by default (SendGrid, Mailchimp, HubSpot, and others all do this out of the box), not yours. That passes DKIM but won't align with DMARC later.
- Google Workspace: Generate the key in Admin Console > Apps > Google Workspace > Gmail > Authenticate email, then publish the TXT record it gives you.
- Microsoft 365: Enable custom DKIM signing through the Microsoft 365 Defender portal. Microsoft provides two selector CNAME records per domain.
- ESPs and marketing platforms: Look for "Domain Authentication" or "Custom DKIM" in your platform's settings. This makes the platform sign with your domain (d=yourdomain.com) instead of its own.
Do this for every service that sends mail on your behalf, not just your primary mail server.
Step 4: Test that signing is actually happening
A published DNS record doesn't confirm your platform is signing correctly. Send a test email through each sending service to Red Sift's Investigate tool and check that DKIM shows as passing. This is a live test against the real message headers, not just a DNS lookup, so it catches platforms that have a valid record published but aren't actually applying a signature.
Step 5: Set a rotation schedule
DKIM keys need to be rotated periodically. See "Why is DKIM key rotation important?" and "How often should DKIM keys be rotated?" below for the recommended cadence and reasoning.
If something breaks later, our guide to the most common DKIM and DMARC failures covers exactly how to diagnose and fix it.
Technical questions overview
Why is DKIM key rotation important?
You can rotate DKIM keys by simply replacing the old pair with a new one to authenticate DKIM emails. If a threat actor steals or deciphers your private key, they won’t be able to use it for long if you practice regular DKIM key rotation.
In addition, regularly updating your DKIM keys increases your domain’s email deliverability rate. With DKIM now required by major inbox providers in 2026, proper key management has become essential for maintaining email deliverability.
How often should DKIM keys be rotated?
Industry best practice in 2026 recommends every 6 to 12 months. Frequent rotation stops hackers from intercepting and decoding your cryptographic keys. Less frequent rotation (say, once every couple of years) makes your domain more susceptible to the risk of intercepted or decoded keys.
What’s a long DKIM Key?
Some DNS editors can receive errors when DKIM keys or other TXT entries are longer than 255 characters.
To resolve this issue, you can enter your DKIM key by breaking it up into pieces on a single TXT entry.
For example, if your DKIM key is:
"v=DKIM1; k=rsa; p=abcdefghijklmnopqrstuvwxyzabcdefghijklmnopqrstuvwxyzabcdefghijklmnopqrstuvwxyzabcdefghijklmnopqrstuvwxyzabcdefghijklmnopqrstuvwxyzabcdefghijklmnopqrstuvwxyzabcdefghijklmnopqrstuvwxyzabcdefghijklmnopqrstuvwxyzabcdefghijklmnopqrstuvwxyzabcdefghijklmnopqrstuvwxyzabc"
You can enter it as:
"v=DKIM1; k=rsa; p=abcdefghijklmnopqrstuvwxyzabcdefghijklmnopqrstuvwxyzabcdefghijklmnopqrstuvwxyzabcdefghijklmnopqrstuvwxyzabcdefghijklmnopqrstuvwxyz" "abcdefghijklmnopqrstuvwxyzabcdefghijklmnopqrstuvwxyzabcdefghijklmnopqrstuvwxyzabcdefghijklmnopqrstuvwxyzabcdefghijklmnopqrstuvwxyzabc"
You can divide them at arbitrary places. The double quote enclosed parts should be separated by a single space character, not a new line.
What is DKIM canonicalization?
Canonicalization is a process whereby the headers and body of an email are converted to a canonical standard form before being DKIM signed. This can be thought of as converting data into a standard canonical form.
Some mail systems, such as forwarders, modify emails in transit that can potentially invalidate the DKIM signature applied. While some DKIM signers may accept minor mail modifications, others may be more strict and require stricter canonicalization.
Two canonicalization algorithms have been created to satisfy mild modification to a message and almost no modification to a message before signing. The two canonicalization algorithms are relaxed and simple respectively.
From DKIM’s perspective, the headers and body of an email are separate and canonicalization algorithms are specified for both, one for the headers and another for the body.
They are represented in the format of canonicalization/canonicalization for the header and body respectively. If no canonicalization is specified then simple is used for both headers and body, so it would look like this: simple/simple.
The simple/simple canonicalization is the stricter of the two and allows for almost no modification to the message header and body. However, this can affect the DKIM signature being invalidated by some forwarders as the email passes through them. Many of the issues with DKIM being invalidated during forwarding can be solved if the canonicalization is changed to relaxed/relaxed to allow for mild modifications to the emails.
What is a DKIM selector?
A DKIM selector is a string that points to a specific DKIM public key record in your DNS. It is specified as s= tag in the DKIM-Signature header field and can be found in the technical headers of an email.
Validation on the receiver side uses the selector in combination with the signing domain in order to carry out a DNS query and find the public key in your DNS.
For example:
“selector”._domainkey.yourdomain
When the receiver retrieves the public key it uses it to verify the DKIM signature.

No two services should use the same selector. For example, if you are sending emails from a number of services on behalf of your domain such as Google, Mailchimp, Salesforce, and Sendgrid, each one must use a unique key and selector in your DNS. If the selectors were the same the recipient would not be able to tell which key to use to decipher a particular email.
What is the l= tag in DKIM?
The l= tag in DKIM specifies the length of the message body that should be included in the DKIM hashing and signing process. This means that only the specified portion of the message body is signed, while the remainder is not included in the cryptographic signature.
This tag is optional. If it is not used, the entire message body is included in the signature by default.
What are the security concerns around using the l= tag in DKIM?
When the l= tag is used in DKIM, only a specified portion of the message body is included in the cryptographic signature, leaving the rest unsigned. This creates a security risk, as attackers can modify the unsigned portion of the message without invalidating the DKIM signature.
This vulnerability means that an attacker could intercept a legitimate email from a reputable sender, append malicious content to the unsigned part of the message, and resend it to a recipient who trusts the sender. Such an attack could damage the reputation of the sending domain and potentially deceive recipients.
To mitigate this risk, it is recommended not to use the l= tag in your DKIM signing process. Additionally, audit your vendors to ensure they are not including this tag when sending emails on your behalf.
What is DKIM Header oversigning?
DKIM is used to sign specific headers or parts of the email body, such as the "From," "Subject," and other headers, to verify the identity of the sender and ensure the integrity of the message. If a signed header is modified after being sent, the DKIM verification will fail.
Attackers may attempt to inject additional headers into an email or modify existing ones for malicious purposes. Oversigning common headers, such as "From," "Subject," "Reply-To," etc., can help protect your emails from manipulation and replay attacks. Oversigning means that you include multiple instances of the same header, effectively signing each one to prevent tampering.
By sending a test email to Red Sift’s Investigate tool, you will be able to see what headers are DKIM signed in your email and if you are oversigning.
What is a DKIM replay attack?
A DKIM replay attack exploits the fact that a DKIM signature doesn't expire by default and isn't tied to a specific recipient. Here's how it works. An attacker creates or gains access to a mailbox on a domain with a strong sending reputation. They send a single legitimate email from that domain to a mailbox they control. Because the email is genuinely sent and signed, it carries a valid DKIM signature. The attacker then takes that signed message and re-broadcasts it to thousands of recipients who were never the intended audience. Spam filters see a valid DKIM signature from a reputable domain and are more likely to let the message through. Gmail users are particularly exposed because Gmail gives significant weight to domain reputation in its filtering.
If a replay campaign is large enough, spam filters eventually catch on and start flagging messages from that domain. At that point, the signing domain's reputation takes the hit. Legitimate email from the domain starts landing in spam or getting blocked outright, even though the domain owner had nothing to do with the attack.
There are several ways to reduce your exposure to DKIM replay attacks.
Oversign headers. If your DKIM signature only covers a few headers, an attacker can change everything else (including the subject line) and the signature stays valid. Compare a weak signature that only signs three headers:
h=message-id:date:from;
With a stronger one that covers nearly every header:
h=cc:to:subject:message-id:date:from:mime-version:from:to:cc:subject:date:message-id:reply-to;
The more headers included in the signature, the harder it is for an attacker to modify the message without breaking it. See the header oversigning section in this guide for more detail on how this works.
Use signature timestamps and expiration. The DKIM specification (defined in RFC 6376) includes two optional tags that limit how long a signature is valid. The t= tag records the signing time as a Unix timestamp and the x= tag sets an expiration time. For example:
t=1665514330; x=1665812312;
A shorter validity window shrinks the attacker's replay window. If a signature expires 24 hours after signing, it's useless to an attacker who tries to replay it a week later. For high-risk or trial accounts, you could set expiration as short as 10 minutes. For established, low-risk accounts, 24 hours is a reasonable default. Not all ESPs expose these settings, so check with your provider.
Use selectors to segment risk. You can assign different DKIM selectors to different account types, then track signing volume per selector through DMARC reports. If a selector tied to trial or high-risk accounts shows unusual volume, that's an early warning that someone is attempting a replay. DMARC reporting tools like Red Sift OnDMARC can help you monitor this.
Regular key rotation also limits replay exposure by invalidating old signatures when keys change.
What makes a DKIM attack so dangerous?
Part of what makes replay attacks dangerous is that they're hard to catch early. DKIM has no concept of delivery history. A valid signature is a valid signature, whether it's delivered once or a thousand times. Spam filters initially trust the email because the domain's reputation is clean. By the time complaint volumes trigger detection, the damage to your sending reputation is already underway.
This isn't theoretical. In 2023, Proton Mail was hit by a replay attack where attackers re-sent a DKIM-signed message to Gmail users. The emails passed DKIM, DMARC, and even displayed Proton's BIMI logo. Proton responded by rotating their DKIM keys and implementing header oversigning. In 2024, researchers at Zone.eu demonstrated that DKIM-signed emails from Fortune 500 companies could be modified by adding new MIME content to unsigned portions of the message. The forged emails passed DKIM and DMARC verification and displayed verified BIMI logos in recipients' inboxes. Spamhaus has also documented attackers signing emails through platforms like Microsoft 365 and then re-sending them from rogue servers, exploiting the valid DKIM signature to bypass filters.
How does DKIM help with forwarded mail?
DKIM helps with forwarded mail by providing a mechanism to verify the authenticity and integrity of an email, even after it has been forwarded. Forwarding can often alter email headers, which can cause issues with other email authentication methods like SPF (Sender Policy Framework).
Without DKIM, forwarded emails may fail to reach the recipient's inbox, especially if the sender's domain is protected by a strict DMARC (Domain-based Message Authentication, Reporting, and Conformance) policy. With DMARC enforcement now standard in 2026, proper DKIM implementation has become critical for email deliverability. This is because SPF authentication often fails during forwarding, and without both SPF and DKIM, a DMARC policy of p=reject will instruct the recipient's server to reject the email.
It is strongly advised not to set a DMARC policy of "reject" without first implementing an aligned DKIM signature for all your email sending systems. This ensures that at least one authentication mechanism remains intact when SPF fails.
However, it's important to note that DKIM can also fail when an email is forwarded, particularly if the forwarder modifies any of the DKIM-signed headers or the body of the email. This can happen due to email security gateways, external disclaimer banners, or other modifications introduced during the forwarding process.
Can an email contain more than one DKIM signature i.e. be DKIM signed multiple times?
Yes, an email can contain multiple DKIM signatures, and this is quite normal. This typically occurs when an email passes through different systems that each apply their own DKIM signature. For example, an email service provider (ESP) might add a DKIM signature to track reputation feedback, and another DKIM signature might be added when the email is sent from one system to another on its way out to the internet. If both systems are configured to DKIM sign emails, the email will end up with multiple DKIM signatures.
It's important to note that one of the signatures may fail (often the first one, if the email is modified between the initial and subsequent signing), but as long as at least one signature passes verification, the DKIM check will be considered successful.
How does ARC come into play when DKIM or DMARC fail?
As mentioned earlier, DKIM may fail when an email is forwarded. ARC (Authenticated Received Chain) addresses the limitations of DKIM and DMARC in scenarios involving email forwarding and mailing lists by preserving the original authentication results through a sequence of cryptographic signatures, creating a chain of custody.
ARC helps ensure that legitimate emails can be trusted and delivered, even if modifications by intermediaries cause DKIM or DMARC failures. It does this by allowing the forwarding server to attest to the original authentication results and the integrity of the message when it was first received.
However, the use of ARC relies on the email forwarder to implement it, establishing this chain of custody. Even if an email passes ARC, it does not necessarily guarantee that the email will be trusted or delivered to the recipient's inbox. The final decision lies with the receiving system, which determines whether to trust the established chain of custody.
Common DKIM misconfigurations
- Using Weak or Deprecated Cryptographic Algorithms: Avoid using DKIM keys that are less than 1024 bits. A 2048-bit key is recommended for stronger security. Additionally, ensure you use up-to-date cryptographic algorithms, such as
rsa-sha256. - Not Splitting Longer Keys Correctly in DNS: When publishing a 2048-bit key in DNS, it may be necessary to split the key into multiple DNS records if your DNS host does not automatically handle this. Failure to do so can result in DKIM verification failures. Refer to the specific guidance or examples provided for splitting keys correctly.
- Enabling DKIM in a Third-Party System Without Publishing the Corresponding Public Key: DKIM relies on a private/public key pair. The sender (e.g., a third-party vendor) holds the private key, which is used to sign outgoing emails. It is crucial to publish the corresponding public key in your domain's DNS records, provided by the vendor, to enable proper DKIM verification.
- Missing Required Tags in a DKIM Record: Ensure that your DKIM record begins with
v=DKIM1;. This is a required tag that identifies the record as a DKIM record. - Using the Wrong Record Type: Make sure to publish your DKIM record using the correct DNS record type, such as TXT or CNAME, as specified by the third-party sender. Some providers may require a TXT record for DKIM, while others might use CNAME. Additionally, some vendors, like Microsoft 365 or Amazon SES, may provide multiple DKIM records to facilitate easy key rotation and management.
- Publishing wildcard DKIM TXT records: Avoid wildcard TXT records that could match DKIM selector lookups. A wildcard could cause verifiers to apply keys to selectors where none should exist, creating confusion and potential exploitation vectors.

DKIM recommendations summary
- Oversign email headers.
- Rotate DKIM keys at least once a year.
- Use strong keys (at least 1024-bit) and up-to-date algorithms.
- Avoid using the l= tag.
- Remove unused DKIM records from DNS.
- Set the t=s flag on selectors that should only sign for the exact domain, preventing them from being used to sign email for subdomains.
- Implement DMARC with DKIM for better insight and protection.
Technical DKIM configuration tips
Generating 2048 bits DKIM public and private keys using OpenSSL on a Mac
Learn how to generate 2048 bits DKIM public and private keys using the Mac terminal and create a DNS record.
How to generate the private and public keys
- Open the terminal and type
openssl - To generate a private key type:
openssl genrsa -out private.key 2048 - To generate a public key from the private key type:
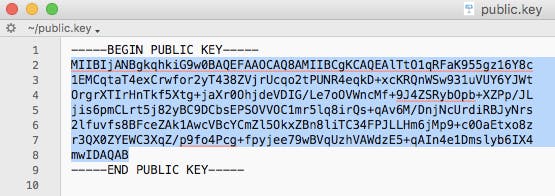
openssl rsa -in private.key -pubout -out public.key - Find the folder that contains your public key and open it. It should look something like the image below.
- Manually convert the highlighted text above to a single line ie. remove the spaces between new lines.
How to create the DNS record
The generated 2048-bit DKIM public key is too long to fit into a single TXT DNS record. A DNS record can be up to 255 characters. Therefore your public key will need to be split into two separate TXT records using quotes and slash or brackets and quotes as shown below.
Note: this depends on your DNS provider.
TXT"part one" \ "part two"TXT( "part one" "part two" )
To create the DNS record you will have to specify the Name, Type, and Value of the DNS record.
The DNS record Name will look like this:
selector._domainkey.domain
Where the selector is defined by you and can be called anything, for example, the date, device, or service that will sign the emails.
For example:
20180719._domainkey.redsift.io
The DNS record Type is TXT.
The DNS record Value should look like the examples below. The part in bold is copied from the generated public key file and remember that you will need to split the public key into two records.
Splitting examples
Example 1 using quotes
TXT record 1:
“v=DKIM1; k=rsa; p=MIIBIjANBgkqhkiG9w0BAQEFAAOCAQ8AMIIBCgKCAQEAlTtO1qRFaK955gz16Y8c1EMCqtaT4exCrwfor2yT438ZVjrUcqo2tPUNR4eqkD+xcKRQnWSw931uVUY6YJWtOrgrXTIrHnTkf5Xtg+jaXr0OhjdeVDIG/Le7oOVWncMf+9J4ZSRybOpb+XZPp/JLjis6pmC”
TXT record 2:
“Lrt5j82yBC9DCbsEPSOVVOC1mr5lq8irQs+qAv6M/DnjNcUrdiRBJyNrs2lfuvfs8BFceZAk1AwcVBcYCmZl5OkxZBn8liTC34FPJLLHm6jMp9+c0OaEtxo8zr3QX0ZYEWC3XqZ/p9fo4Pcg+fpyjee79wBVqUzhVAWdzE5+qAIn4e1Dmslyb6IX4mwIDAQAB”
Example 2 using brackets and quotes
TXT record 1:
(“v=DKIM1; k=rsa; p=MIIBIjANBgkqhkiG9w0BAQEFAAOCAQ8AMIIBCgKCAQEAlTtO1qRFaK955gz16Y8c1EMCqtaT4exCrwfor2yT438ZVjrUcqo2tPUNR4eqkD+xcKRQnWSw931uVUY6YJWtOrgrXTIrHnTkf5Xtg+jaXr0OhjdeVDIG/Le7oOVWncMf+9J4ZSRybOpb+XZPp/JLjis6pmC”
TXT record 2:
“Lrt5j82yBC9DCbsEPSOVVOC1mr5lq8irQs+qAv6M/DnjNcUrdiRBJyNrs2lfuvfs8BFceZAk1AwcVBcYCmZl5OkxZBn8liTC34FPJLLHm6jMp9+c0OaEtxo8zr3QX0ZYEWC3XqZ/p9fo4Pcg+fpyjee79wBVqUzhVAWdzE5+qAIn4e1Dmslyb6IX4mwIDAQAB”)
Frequently asked questions: Email protocol configuration guide
In a pre-DMARC era, SPF records commonly used the "-all" mechanism to strictly enforce sender policies. However, current industry guidance in 2026 favours "~all" to balance security and deliverability, avoiding unnecessary rejection of valid emails that might fail SPF but pass DKIM and DMARC.
This is because "~all" when implemented in combination with DMARC (at p=reject) will still reject unauthenticated mail if SPF and DKIM fail, but does not block legitimate mail, thus enhancing overall email deliverability.
The DMARC specification (RFC 7489) states that a "-" prefix on a sender's SPF mechanism, such as "-all", could cause rejection to go into effect early in handling, causing message rejection before any DMARC processing takes place. Use "-all" for inactive, non-email sending domains only (domains that send no emails at all). DMARC ignores the nuances of soft fail and hard fail in SPF configuration, treating them as SPF failures.
DMARC does not only require SPF or DKIM to PASS but it also requires at least one of the domains used by SPF or DKIM to align with the domain found in the From header. Proper alignment is critical for email deliverability in 2026, as major inbox providers enforce these requirements.
In the case of SPF, identifier alignment means that the MAIL FROM/Return-PATH check has to PASS and also the domain portion of the MAIL FROM/Return-PATH has to align with the domain found in the From address. In strict alignment, the domains have to match exactly, whereas in relaxed alignment subdomains are also allowed as long as they come from the same organisational domain.
For example, if MAIL-FROM/RETURN-PATH is @ondmarc.com and From header is @knowledge.ondmarc.com, in strict alignment they are not aligned. However, in relaxed alignment mode, DMARC would pass.
A DMARC aggregate report contains information about the authentication status of messages sent on behalf of a domain. It is an XML feedback report designed to provide visibility into emails that passed or failed SPF and DKIM. The report provides domain owners with precise insight into which sources are sending on your behalf and the disposition of those emails (the policy that was applied by the receiver).
Recipients will look at the 'rua' tag of your DMARC record and send reports there. You can specify the aggregate reporting interval by using the ri tag in your DMARC record (by default, this is set to 86400 seconds which equates to 24 hours). Forensic reports contain more detailed information about individual authentication failures. Any personally identifiable information (PII) is removed, but information that will help in troubleshooting the DMARC failure is included, such as SPF and DKIM header failure information, the entire From address, and the Subject of the email.
The address to receive Forensic DMARC reports is specified by the 'ruf' tag in your DMARC record. Not all receiving systems support sending forensic reports. Red Sift OnDMARC is one of the only DMARC applications on the market that receives forensic reports thanks to its partnership with Yahoo.
An SPF macro refers to a mechanism used in SPF records to define reusable sets of IP addresses. SPF macros enhance the flexibility and maintainability of SPF records by allowing you to define complex sets of IP addresses in a single mechanism, which can then be referenced within multiple SPF records. For example, instead of listing individual IP addresses for each authorised email server, you can define a macro like "%{i}" which calls the sender IP of the email. Managing SPF this way allows you to control a large list of IPs without hitting the SPF lookup limit, and also obscures which IPs you approve for public querying.
However, depending on how the SPF record with macros is structured, the lack of macro expansion could result in SPF failures or 'Neutral' results (denoted by the ?all mechanism). If SPF macros play a critical role in authorising legitimate sending servers, emails might be more likely to fail SPF checks or be marked as suspicious by email receivers that rely on SPF for authentication.
Mail Transfer Agent Strict Transport Security (MTA-STS) is a standard that enables the encryption of messages being sent between two mail servers. It specifies to sending servers that emails can only be sent over a Transport Layer Security (TLS) encrypted connection which prevents emails from being intercepted by cybercriminals.
MTA-STS adoption has grown significantly, with organisations in 2026 recognising transport layer security as essential for protecting email in transit. For receiving domains to enable MTA-STS, they must announce that they support MTA-STS in their DNS and publish a policy configuration file on their website.
Activating MTA-STS must be done carefully to mitigate blocking emails from being delivered. MTA-STS should first be deployed in testing mode, allowing time for TLS reports to provide insight into any errors that need fixing before progressing to the final enforce stage. This phased approach will likely become standard practice in 2026 for organisations implementing transport security.
SMTP TLS Reporting (or TLS-RPT for short) enables reporting of TLS connectivity problems experienced by the sending MTAs and is defined in RFC8460. Much like DMARC, TLS-RPT relies on emailed reports to notify domain owners when delivery fails due to TLS issues. These reports include detected MTA-STS policies, traffic statistics, unsuccessful connections, and failure reasons.
With Red Sift OnDMARC's MTA-STS feature, you don't need to worry about complex deployment. Simply add the MTA-STS Smart Records OnDMARC provides to your DNS and Red Sift does all the hard work such as hosting the MTA-STS policy file, maintaining the SSL certificate, and flagging any policy violation through the TLS report. Modern DMARC platforms in 2026 increasingly include hosted MTA-STS as a standard feature, simplifying transport security deployment.
Published under RFC 7671, DANE (DNS-based Authentication of Named Entities) introduces a new Internet standard for setting up TLS communication between a client and a server, without having to rely on trusted Certificate Authorities (CAs).
The traditional CA model TLS has depended on allows any CA to issue a certificate for any domain. DANE does things differently by relying on the DNSSEC infrastructure (Domain Name System Security Extensions) to bind a domain name to a certificate. DANE makes use of the already existing DNSSEC protocol to make sure the data it receives is authentic and has not been tampered with.
DANE also introduces a new DNS RR type called TLSA which helps to signal to the client that a server supports TLS. The recommendation is to implement both MTA-STS and DANE. DANE is a requirement from many governments, so public agencies in the EU are often required to implement it.
DANE and MTA-STS help only if the sender supports it, however, many senders only support one or the other so implementing both improves security overall. Organisations in 2026 often deploy MTA-STS first for broader compatibility, then add DANE for enhanced security where required.
The subdomain policy allows domain administrators to protect different domains and subdomains based on how far they are along the DMARC journey. For example, if all your email-sending services sending emails on behalf of your top-level domain are fully configured with SPF and DKIM, that means that you can protect your top-level domain with a DMARC policy of p=reject whilst keeping the subdomains in p=none, and vice versa.
Also, if you have an email-sending service that is non-DMARC compliant (does not support SPF or DKIM), you may decide to assign a subdomain to it and have that subdomain in a different DMARC policy, without preventing you from protecting your other domains. This allows you to split the traffic across different subdomains and protect each one separately.